Moving HomeAssistant to a single-board computer
My Home Assistant container has been running on my Intel-based server with the rest of my containers. But with power outages becoming more frequent, I thought I would move it to a low-power ARM computer and put it on my UPS with the router and modem.
Hardware
- Le Potato by Libre Computer Project. This is basically a more effecient version of a Pi 3B. I bought one a few years back when they were $35.
- CyberPower LX1500GU UPS. The lead-acid batteries only last about five years, but you can open them up and replace easily.
- Wireless router running OpenWRT. Mine is an old TPLink AC1200 Archer A6. You don't strictly need this, but I like to let all my devices run DHCP and assign IPs from the router interface.
- MicroSD card
- USB micro cable (to power le potato)
- USB B cable (to talk with the UPS)
- Ethernet cable
- USB keyboard (for setup)
- HDMI Monitor (for setup)
Software
- Armbian
- Imaging tool. I used the Raspberry Pi Imager, but there are many options. Balena Etcher is a popular choice. The classic option is
dd, though it seemscatis faster. - DietPi conversion script
- Docker and Docker-compose
- Eclipse Mosquotto
- rsync
- Network UPS Tools
DietPi on Le Potato
- Download Armbian and flash the SD card using your imaging tool.
- Attempt to follow the instructions for the DietPi conversion script.
- While this is going is a good time to assign a static lease in OpenWRT.
- When the script hangs on
systemctl start serial-getty@ttyS0, reboot. Le Potato doesn't have a hardware serial onttyS0but instead hasttyAML0. - Continue the installation. Don't forget to enable ethernet with
dietpi-configor it will not connect to the internet at next boot - Use
dietpi-softwareto installdocker,docker-compose, andmosquitto. - Configure the mqtt password with mosquitto-passwd. It helps to remove
/etc/mosquitto/passwdbefore creating a new one. Restart withsystemctl restart mosquitto - Use
apt installto get small utilities likersync,tmux,btop, andvim-tiny.
Home Assistant container
- Create a working directory with
mkdir homeassistant && cd homeassistant - Create docker compose file:
docker-compose.yml
services:
  homeassistant:
    image: "ghcr.io/home-assistant/home-assistant:stable"
    container_name: homeassistant
    restart: unless-stopped
    privileged: false
    volumes:
      - ./config:/config
      - /etc/localtime:/etc/localtime:ro
    ports:
- 8123:8123The UPS
Since we're connected to a UPS, why not try to monitor it too? Install the Network UPS Tools with apt install nut. Follow the setup instructions from the Debian wiki. Maybe read the Arch Linux wiki too.
Here's what my config files ended up looking like:
/etc/nut/nut.conf
MODE=standalone/etc/nut/ups.conf
[CyberPower]
    driver = usbhid-ups
    port = auto
    vendorid = 0764
    productid = 0501
    desc = "UPS shared with router & modem"
Then start the service with systemctl restart nut-server and check the result.
systemctl status nut-server
● nut-server.service - Network UPS Tools - power devices information server
     Loaded: loaded (/usr/lib/systemd/system/nut-server.service; enabled; preset: enabled)
     Active: active (running) since Sun 2026-08-30 18:14:54 PDT; 3s ago
 Invocation: 2e39f7e6253b40018b55fc2479f175ab
    Process: 52137 ExecStartPre=/usr/bin/systemd-tmpfiles --create /usr/lib/tmpfiles.d/nut-common-tmpfiles.conf (code=exited, status=0/SUCCESS)
   Main PID: 52139 (upsd)
      Tasks: 1 (limit: 2098)
     Memory: 712K (peak: 1.7M)
        CPU: 109ms
     CGroup: /system.slice/nut-server.service
             └─52139 /lib/nut/upsd -F
Aug 30 18:14:54 lepotato upsd[52139]: Connected to UPS [CyberPower]: usbhid-ups-CyberPower
Aug 30 18:14:54 lepotato upsd[52139]: Found 1 UPS defined in ups.conf
Aug 30 18:14:54 lepotato nut-server[52139]: Running as foreground process, not saving a PID file
Aug 30 18:14:54 lepotato nut-server[52139]: upsnotify: notify about state 2 with libsystemd: was requested, but not running as a service unit now, will not spam more about it
Aug 30 18:14:54 lepotato nut-server[52139]: upsnotify: failed to notify about state 2: no notification tech defined, will not spam more about it
Aug 30 18:14:54 lepotato nut-server[52139]: upsnotify: logged the systemd watchdog situation once, will not spam more about it
Aug 30 18:14:54 lepotato upsd[52139]: Running as foreground process, not saving a PID file
Aug 30 18:14:54 lepotato upsd[52139]: upsnotify: notify about state 2 with libsystemd: was requested, but not running as a service unit now, will not spam more about it
Aug 30 18:14:54 lepotato upsd[52139]: upsnotify: failed to notify about state 2: no notification tech defined, will not spam more about it
Aug 30 18:14:54 lepotato upsd[52139]: upsnotify: logged the systemd watchdog situation once, will not spam more about it
Now let's see what data is availble?
upsc cyberpower
battery.charge: 100
battery.charge.low: 10
battery.charge.warning: 20
battery.mfr.date: CPS
battery.runtime: 40320
battery.runtime.low: 300
battery.type: PbAcid
battery.voltage: 24.0
battery.voltage.nominal: 24
device.mfr: CPS
device.model: LX1500GU
device.serial: QAKGU2002418
device.type: ups
driver.debug: 0
driver.flag.allow_killpower: 0
driver.name: usbhid-ups
driver.parameter.pollfreq: 30
driver.parameter.pollinterval: 2
driver.parameter.port: auto
driver.parameter.productid: 0501
driver.parameter.synchronous: auto
driver.parameter.vendorid: 0764
driver.state: quiet
driver.version: 2.8.1
driver.version.data: CyberPower HID 0.8
driver.version.internal: 0.52
driver.version.usb: libusb-1.0.28 (API: 0x100010a)
input.voltage: 120.0
input.voltage.nominal: 120
output.voltage: 120.0
ups.beeper.status: enabled
ups.delay.shutdown: 20
ups.delay.start: 30
ups.load: 0
ups.mfr: CPS
ups.model: LX1500GU
ups.productid: 0501
ups.realpower.nominal: 900
ups.serial: QAKGU2002418
ups.status: OL
ups.test.result: No test initiated
ups.timer.shutdown: -60
ups.timer.start: -60
ups.vendorid: 0764
Publishing data
We'll need some extra tools for this. Run apt install mosquitto-clients yq-go
Next we're going to make an MQTT service and publish this data to Home Assistant. Here's the data that seems useful to have in a power outage:
- Battery charge
- Battery voltage
- Battery runtime
- UPS load
So we'll set up a discovery.json file to communicate these:
discovery.json
{
  "qos": 2,
  "dev": {
    "mdl": "LX1500GU",
    "sw": "CyberPower HID 0.8",
    "ids": "QAKGU2002418",
    "name": "UPS",
    "mf": "CyberPower"
  },
  "o": {
    "name": "Marshal's UPS Script",
    "sw": "0.0.1"
  },
  "cmps": {
    "QAKGU2002418_charge": {
      "unit_of_measurement": "%",
      "value_template": "{{value_json['battery.charge']}}",
      "name": "Battery charge",
      "expire_after": 600,
      "device_class": "battery",
      "p": "sensor",
      "unique_id": "QAKGU2002418_charge",
      "state_topic": "homeassistant/ups/status"
    },
    "QAKGU2002418_bvolts": {
      "unit_of_measurement": "V",
      "value_template": "{{value_json['battery.voltage']}}",
      "name": "Battery Volts",
      "expire_after": 600,
      "device_class": "voltage",
      "p": "sensor",
      "unique_id": "QAKGU2002418_bvolts",
      "state_topic": "homeassistant/ups/status"
    },
    "QAKGU2002418_ivolts": {
      "unit_of_measurement": "V",
      "value_template": "{{value_json['input.voltage']}}",
      "name": "Mains Voltage",
      "expire_after": 600,
      "device_class": "voltage",
      "p": "sensor",
      "unique_id": "QAKGU2002418_ivolts",
      "state_topic": "homeassistant/ups/status"
    },
    "QAKGU2002418_load": {
      "unit_of_measurement": "W",
      "value_template": "{{value_json['ups.load']}}",
      "name": "UPS Load",
      "expire_after": 600,
      "device_class": "power",
      "p": "sensor",
      "unique_id": "QAKGU2002418_load",
      "state_topic": "homeassistant/ups/status"
    },
    "QAKGU2002418_runtime": {
      "unit_of_measurement": "min",
      "value_template": "{{value_json['battery.runtime']}}",
      "name": "UPS runtime",
      "expire_after": 600,
      "device_class": "duration",
      "p": "sensor",
      "unique_id": "QAKGU2002418_runtime",
      "state_topic": "homeassistant/ups/status"
    }
  }
}- Create a file with your MQTT username and password
mqtt.env
MQTT_USER="your mqtt user"
MQTT_PASS = "your mqtt password"- Load them into your environment with
export $(cat mqtt.env | xargs) - Publish with
mosquitto_pub -h localhost -u "$MQTT_USER" -P "$MQTT_PASS" -t "homeassistant/device/QAKGU2002418/config" -f discovery.json -r
Next we'll pipe the UPS status into the MQTT message. I want this to run periodically, so we'll put it in a file.
ups_status.sh
#!/usr/bin/env bash
SCRIPT_DIR="$(cd "$(dirname "${BASH_SOURCE[0]}")" &>/dev/null && pwd)"
export $(cat $(SCRIPT_DIR)/mqtt.env | xargs)
upsc cyberpower | \
grep -E 'charge|voltage|runtime|load' | \
yq -o=json | \
mosquitto_pub -h localhost -u "$MQTT_USER" -P "$MQTT_PASS" \
-t "homeassistant/ups/status" -s
Now I have a new MQTT topic with the message
homeassistant/ups/status
{
  "battery.charge": 100,
  "battery.charge.low": 10,
  "battery.charge.warning": 20,
  "battery.runtime": 41610,
  "battery.runtime.low": 300,
  "battery.voltage": 24,
  "battery.voltage.nominal": 24,
  "input.voltage": 121,
  "input.voltage.nominal": 120,
  "output.voltage": 121,
  "ups.load": 0
}
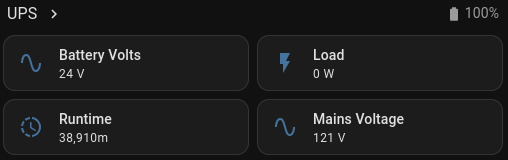
And now in Home Assistant, we have a pretty picture!
Making it automatic
Although we have crontab, I find it difficult to debug because it only emails the error rather than printing them in the syslog. Instead, we will be doing this with Systemd Timers.
- Create a service file
/etc/systemd/system/ups_status.service
[Unit]
Description=Publishes UPS status
After=network-online.target
Requires=network-online.target
Requires=nut-server.service
[Service]
Type=oneshot
ExecStart=/home/marshal/homeassistant/ups_status.sh
- Create a timer file
/etc/systemd/system/ups_status.timer
[Unit]
Description=Publish UPS status
[Timer]
OnBootSec=5min
OnUnitActiveSec=1min
[Install]
WantedBy=timers.target
- Enable the timer with
systemctl enable ups_status.timer